
Pattern: Chinese New Year Doll
Here at long last is the pattern for the Chinese New Year Doll that I made as many of you have been asking for it! Once again, thank you so much for your encouragement and support of this blog! I am happy to provide this pattern since, as many of you have written, seeing this doll has rekindled your passion for crocheting or got you interested in amigurumi. // ]]>
This is my first original pattern and the first one I’ve ever written up, so if you have any questions or find any errors, please let me know! I would be delighted to hear from you as you try to make this doll, and please feel free to share the photos with us on my facebook fan page!
Let’s begin!

Materials:
- Black, red and skin-coloured (cream) yarn; the following are the exact brands I used: Skin-colour: “Patons Canadiana” yarn in “Oatmeal”- Medium (4), 100% acrylic; Black: “Patons Grace” yarn; Light (3), 100% mercerized cotton; Red: “Patons Grace” yarn- Light (3), 100% mercerized cotton Note: I used yarn of varying weight, so if you end up using yarn of the same weight, you may need to alter the pattern as needed.
- 2.00 mm Clover Amour crochet hook
- Yarn needle (bent tip helpful for attaching amigurumi parts- see HERE)
- Fiberfill (and rice to fill her body if you would like to give more weight)
- Pink felt (for the cheeks)
- 9 mm safety eyes
- Black embroidery floss (for the smile and eyelashes)
- Yellow and grey embroidery floss (for the balls attached to her chopsticks)
- Two toothpicks
- Glue gun
Note: I worked in continuous rounds (vs. joined rounds) and used the 2.00 mm crochet hook all throughout to get a tighter gauge. Feel free to follow along with my blog post to see step-by-step photos.
HAIR
Using black yarn, we will make: (1) a big black circle, (2) a smaller black circle, and (3) a bun.
(1) Big Circle:
R1: 6 sc in Magic Ring. (6 sts)
R2: 2 sc in each sc around. (12 sts)
R3: *Sc 1, 2 sc in next sc*, rep 6 times. (18 sts)
R4: *Sc 2, 2 sc in next sc*, rep 6 times. (24 sts)
R5: *Sc 3, 2 sc in next sc*, rep 6 times (30 sts)
R6: *Sc 4, 2 sc in next sc*, rep 6 times (36 sts)
R7 – 12: Sc 36
Fasten off. Ends can be tucked in when gluing/sewing hair to head. Flip inside out (it becomes less curved so that it fits the head better).
(2) Small circle:
R1: 6 sc in Magic Ring. (6 sts)
R2: 2 sc in each sc around. (12 sts)
R3: *Sc 1, 2 sc in next sc*, rep 6 times. (18 sts)
R4: *Sc 2, 2 sc in next sc*, rep 6 times. (24 sts)
R5: *Sc 3, 2 sc in next sc*, rep 6 times (30 sts)
R6: *Sc 4, 2 sc in next sc*, rep 6 times (36 sts)
R7 – 8: Sc 36
Fasten off. Ends can be tucked in when gluing/sewing hair to head. Flip inside out (it becomes less curved so that it fits the head better).
(3) Bun:
R1: 6 sc in Magic Ring. (6 sts)
R2: 2 sc in each sc around. (12 sts)
R3: *Sc 1, 2 sc in next sc*, rep 6 times. (18 sts)
R4: *Sc 2, 2 sc in next sc*, rep 6 times. (24 sts)
R5-6: Sc 24
R7: *Sc 2, dec 1*, rep 6 times. (18 sts)
Stuff bun firmly.
R8: *Sc 1, dec 1*, rep 6 times. (12 sts)
R9: *Dec 1*, rep 6 times. (6 sts)
Fasten off and leave end for attaching bun to black circles. Alternatively, you could make two smaller side buns for an equally cute look =D
HEAD
Using skin-coloured yarn,
R1: 6 sc in Magic Ring. (6 sts)
R2: 2 sc in each sc around. (12 sts)
R3: *Sc 1, 2 sc in next sc*, rep 6 times. (18 sts)
R4: *Sc 2, 2 sc in next sc*, rep 6 times. (24 sts)
R5: *Sc 3, 2 sc in next sc*, rep 6 times (30 sts)
R6: *Sc 4, 2 sc in next sc*, rep 6 times (36 sts)
R7 – 13: Sc 36
R14: *Sc 4, dec 1*, rep 6 times (30 sts)
R15: *Sc 3, dec 1* rep 6 times (24 sts)
Add details to face. Place overlapping black circles on head to see roughly where to place eyes. Insert 9 mm eyes, sew eyelashes and smile using embroidery floss. Pink cheeks can be glued on now or after stuffing.
R16: *Sc 2, dec 1*, rep 6 times. (18 sts)
Stuff head firmly.
R17: *Sc 1, dec 1*, rep 6 times. (12 sts)
R18: *Dec 1*, rep 6 times. (6 sts)
Fasten off and weave in end.
Attaching hair to head:
- First place the big circle ontop of her head. Then overlap the small circle ontop of the big circle to give her a side part. (Note: her hair will look kind of funny from the back, like a receding hairline, but the front is more critical).
- Glue gun or sew these circles to the head
- Then sew the bun ontop of the black circles.
Chopsticks Hair Ornaments:
Make two small balls using grey and yellow (or your favourite colours) embroidery floss according to this pattern:
R1: 3 sc in Magic Ring. (3 sts)
R2: 2 sc in each sc around. (6 sts)
R3: Sc 6
R4: *Dec 1*, rep 3 times (3 sts)
Fasten off and leave ends to hang off toothpicks.
Use a glue gun to attach tail of ball to toothpick. Criss cross the toothpicks and insert them into her bun.
DRESS
Her dress consists of 3 parts using red yarn: (1) The body (2) The sleeves (3) Dress base (bottom)
(1) Body (this is pretty much a simple tube):
Ch 18, join first and last sts with sl st to form a ring.
R1 – 10: Sc 18
Fasten off and weave in end (or it can be tucked into the dress when you fill it with fiberfill/rice).
(2) Dress base:
R1: 6 sc in Magic Ring. (6 sts)
R2: 2 sc in each sc around. (12 sts)
R3: *Sc 1, 2 sc in next sc*, rep 6 times. (18 sts)
R4: *Sc 2, 2 sc in next sc*, rep 6 times. (24 sts)
Fasten off and leave long tail to attach dress base to body.
Stuff body firmly with fiberfill/rice. Attach the dress base to the body with single crochets going all around (using end from dress base) to give a nice decorative edge
(3) Sleeves (they should flare out):
R1: 3 sc in Magic Ring. (3 sts) [leave long tail to later attach sleeves to body]
R2: 2 sc in each sc around. (6 sts)
R3-4: Sc 6
R5: *Sc 1, 2 sc in next sc*, rep 3 times. (9 sts)
R6: *Sc 2, 2 sc in next sc*, rep 3 times. (12 sts)
R7-9: Sc 12
HANDS
Using cream-coloured yarn, make two balls:
R1: 6 sc in Magic Ring. (6 sts)
R2: Sc 6
R3: *Dec 1*, rep 3 times (3 sts)
Fasten off and weave in end (or it can be tucked in when hands are glued/sewed into sleeves).
Attaching hands and sleeves:
- Glue/sew hands into sleeves.
- Sew sleeves onto sides of dress.
- Hook cream-coloured yarn through both hands and tie a knot to secure them together. Hide ends of knot by weaving ends back into hands.
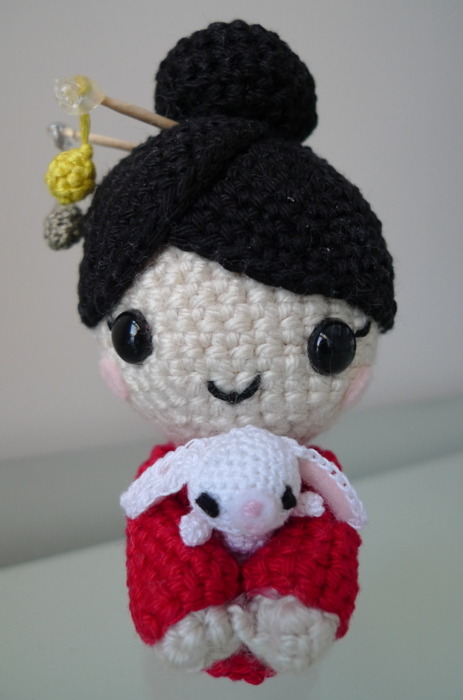
Now your Chinese New Year Doll is ready to hold anything!!!
If you would like to make the little rabbit that she is holding in the photos, please see Ana Paula Rimoli’s “Amigurumi Too: Crocheted Toys for Me and You and Baby Too” for the pattern. I used “Aunt Lydia’s Extra Fine Crochet Thread” (100% mercerized cotton, 30 size) and a 1.25 mm crochet hook to make the tiny bunny.
Have a great time making your own Chinese New Year Doll, everyone! Happy crocheting!
This pattern is an original pattern by Stephanie Lau of All About Ami (February 2011). Please do not claim this pattern as your own. If you wish to share this pattern, you may link to this pattern but please do not reprint it on your site. You may keep a copy for your own personal use but please DO NOT sell the pattern or distribute it.
You may sell products made from this pattern but please clearly credit the design to me, Stephanie Lau of All About Ami, and provide a link to my blog www.AllAboutAmi.com. Permission is NOT granted for mass production or factory manufacturing of any kind. Thank you for being respectful and for your understanding!


