
Pattern: Baby P.J. Teddy
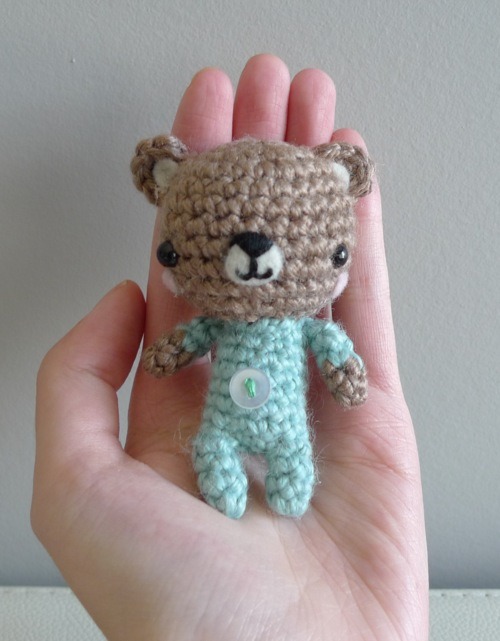
Make a baby version of my P.J. Teddies if you’re looking for an extra cute, cuddly and petite amigurumi :)
Materials:
- brown yarn (for head and arms), blue yarn (for pajama colour)
- 2.00 mm Clover Amour crochet hook
- Yarn needle (bent tip helpful for attaching amigurumi parts- see HERE)
- fiberfill
- beige felt (for nose and ears) and pink felt (for cheeks)
- 6 mm safety eyes
- black embroidery floss (for nose)
- small button
- glue gun
Note: I worked in continuous rounds (vs. joined rounds). Feel free to follow along with my blog post here to see step-by-step photos.
HEAD
Using brown yarn,
R1: 6 sc in magic ring. (6 sts)
R2: 2 sc in each sc around. (12 sts)
R3: *Sc 1, 2 sc in next sc*, rep 6 times. (18 sts)
R4: *Sc 2, 2 sc in next sc*, rep 6 times. (24 sts)
R5-10: Sc 24
R11: *Sc 2, dec 1*, rep 6 times. (18 sts)
Add safety eyes and stuff head firmly.
R12: *Sc 1, dec 1*, rep 6 times. (12 sts)
R13: *Dec 1*, rep 6 times. (6 sts)
Fasten off and weave in end.
EARS (make 2)
Using brown yarn,
R1: 3 sc in magic ring. (3 sts)
R2: 2 sc in each sc around. (6 sts)
Fasten off and leave long end for sewing. Sew ontop of head. Cut two semi-circles out of beige felt. Glue/sew felt pieces onto ears.
LEGS (make 2) + BODY
Using blue yarn,
R1: 4 sc in magic ring. (4 sts)
R2-3: Sc 4
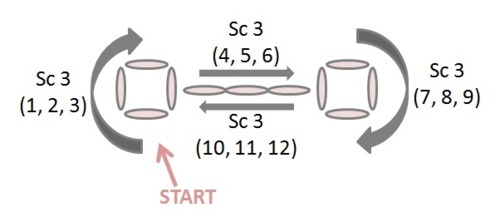
For the first leg, fasten off (no need to leave long end for sewing). For the second leg, DO NOT cut off the yarn. Chain 3 and join with slip stitch through both loops of a sc on the first leg. See diagram below:

Single crochet around first leg (3 sc), Sc across one side of three chains joining legs (3 sc), Sc around second leg (3 sc) and Sc across other side of three chains joining legs (3 sc). There should be 12 sts in total. What we just did will count as the first row of the body. See diagram below (numbering of stitches in brackets):
BODY
R1: 12 sc around
R2-8: 12 sc
Sew button onto body. Stuff firmly. Fasten off and leave long end for sewing. Sew body to head.
ARMS (make 2)
Using brown yarn,
R1: 4 sc in magic ring. (4 sts)
R2: Sc 4
Switching to blue yarn,
R3-4: Sc 4
Stuff firmly.
Fasten off and leave long end for sewing. Attach to sides of body.
Adding details:
- Cut out oval using beige felt. Using black embroidery floss, embroider nose onto beige oval as shown in picture. Glue nose onto face.
- Cut two ovals out of pink felt. Glue ovals underneath eyes as shown in picture.
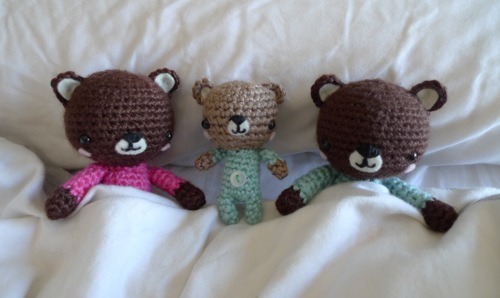
Now you’ve made an adorable baby P.J. teddy to accompany the bigger ones. Doesn’t he look so sweet wearing his onesie? Click here to make the bigger versions of the P.J. Teddies. If you have any questions or find any errors, feel free to contact me. Thanks and good luck!
This pattern is an original pattern by Stephanie Lau of All About Ami (August 2011). Please do not claim this pattern as your own. If you wish to share this pattern, you may link to this pattern but please do not reprint it on your site. You may keep a copy for your own personal use but you please DO NOT sell the pattern or distribute it.
You may sell products made from this pattern but please clearly credit the design to me, Stephanie Lau of All About Ami, and provide a link to my blog www.AllAboutAmi.com. Permission is NOT granted for mass production or factory manufacturing of any kind. Thank you for being respectful and for your understanding!


