Setting Up and Monitoring Node.js Apps on Elastic Beanstalk
There has been a lot of talk in the news lately about Amazon Web Services and AWS Elastic Beanstalk. The ability to use this deployment agent for Node.js means it is simple to get your Node.js product in the AWS Cloud. Since simplicity is near and dear to NodeFly’s heart, we wanted to try out EB. And since we fully encourage you to monitor Node.js from the start, we wanted to test installing our agent to monitor a Node.js product on Beanstalk.
To monitor your product, you first need to install it. And we found that setting up on Elastic Beanstalk was straightforward. You can do so through Git, or through the Eb command line interface.
Note that while we are covering some of the steps for set-up here, it is a general overview. Please refer to the AWS documentation for complete details.
The first thing you will want to do is sign up for AWS.
Sign into AWS, or create an account if you haven’t already:
http://aws.amazon.com/console/
Go to the Security Credentials page:
https://portal.aws.amazon.com/gp/aws/securityCredentials
Create an Access Key (or maybe make a new one for managing your EB)
You will be given your Access Key ID, which you will need during the install process. The Access key is available in the Security Credentials section on the left hand side of the screen.

Download the dev tools and add them to your path. You will find them here:
http://docs.aws.amazon.com/elasticbeanstalk/latest/dg/GettingStarted.GetSetup-devtools.html
We also liked the command line tool available here:
http://aws.amazon.com/code/6752709412171743
Now unzip somewhere. We chose to do so here: ~/aws
Create a new git repository:
> git init .
Run the AWS dev tools in that directory:
> ~/aws/AWS-ElasticBeanstalk-CLI-2.3.1/AWSDevTools/Linux/AWSDevTools-RepositorySetup.sh
Is everything going well? Good. Let’s keep going.
Put some code together. We’re providing a simple example by installing Express. You can use that, or some other app. Ensure that it’s up-to-date and use best practices.
Install ‘express’ with npm and then run it.
Now put the Nodefly header at the start of it AND update package.json
Check to make sure it works locally first.
> npm install -g express
> express
Put Nodefly at the top of your module in app.js:
require('nodefly’).profile(
'5ffde81cb687f5760b2479fcaee3b6c0’,
“aws-test”
);
Add it to the package.json -> “nodefly”: “latest”
> npm install
This is a good time to test things locally just to make sure you didn’t screw up. Open up http://localhost:3000/ in your browser.
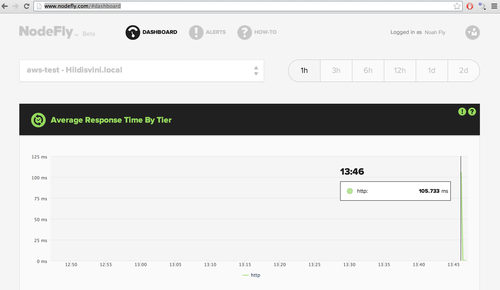
You can also then go and check out http://www.nodefly.com/#dashboard to see if your new app is showing up. As you can see below, our Express app has a heartbeat.
Now, add the next three lines to your .gitignore file to skip things we don’t need to store in git:
node_modules/
.gitignore
.elasticbeanstalk/
You can also add the platform-specific eb path to your $PATH
> export PATH=“$PATH:/Users/andrew/aws/AWS-ElasticBeanstalk-CLI-2.3.1/eb/macosx/python2.7"
Run eb:
> eb init
Remember the AWS Access Key ID and Secret Access Key you got earlier? If you forget, just pop on back to:
https://aws-portal.amazon.com/gp/aws/securityCredentials
Enter your AWS Access Key ID:
Enter your AWS Secret Access Key:
Select an AWS Elastic Beanstalk service region (you will see a list of 8 available service regions).
Enter an AWS Elastic Beanstalk application name (auto-generated value is "aws-test”):
Enter an AWS Elastic Beanstalk environment name (auto-generated value is “aws-test-env”):
Select a solution stack (you will see a list of 18 available solution stacks):
Create an RDS DB Instance? [y/n]: n
Updated AWS Credential file at “/Users/[username]/.elasticbeanstalk/aws_credential_file”.
> eb start
This deploys the pretty default node.js app to Eb.
Let’s check out the console:
https://console.aws.amazon.com/elasticbeanstalk/home
There’s also a handy button to go and see the default EB app that’s been installed:
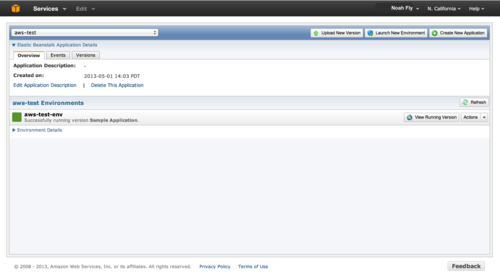
Let’s take a look at that:

Now, let’s upload our own express app that we added NodeFly to:
> git add .
> git commit -m “Demo app”
[master (root-commit) f5ae4e6] Demo app
9 files changed, 141 insertions(+)
create mode 100644 .elasticbeanstalk/config
create mode 100644 .elasticbeanstalk/optionsettings.aws-test-env
create mode 100644 app.js
create mode 100644 package.json
create mode 100644 public/stylesheets/style.css
create mode 100644 routes/index.js
create mode 100644 routes/user.js
create mode 100644 views/index.jade
create mode 100644 views/layout.jade
> git aws.push
Counting objects: 16, done.
Delta compression using up to 4 threads.
Compressing objects: 100% (14/14), done.
Writing objects: 100% (16/16), 2.42 KiB, done.
Total 16 (delta 0), reused 0 (delta 0)
remote:
To https://.….
* [new branch] HEAD -> master
Go back to the Eb console and monitor your application’s status there:
https://console.aws.amazon.com/elasticbeanstalk/home
It will take a few minutes to deploy and restart.
Once it’s up, check out your application again via the “View Running Version” button.

Hooray, it’s the default Express app!
Now let’s go back to our NodeFly account and see the data coming in from our application:

VICTORY! We’ve gotten our app - Express, in this case - on Elastic Beanstalk. We’ve also installed the NodeFly agent and can now monitor Express’s performance. We have the visibility we want to monitor, profile and improve our app, and were able to get it online quite easily with Elastic Beanstalk.

