We just wrapped up our Summer Release Keynote over at Kendo UI, and one of the top questions that I received after my demo was “What editor are you using?”. In fact, I got that question so many times that it really kind of shocked me.
So I have taken the liberty of throwing together a video for you of using Sublime Text 2 with the ZenCoding Plugin. I also am using LiveReload and SizeUp. So I suppose it’s more of a workflow video, but it shows you what it’s like to be my computer for roughly 4 minutes.
Here is the breakdown of the tools I use in the video…
SizeUp - This was the thing I use to move windows around with my keyboard. (9$ Mac only. Baked into Windows 7 via Aero Snap).
LiveReload - This is how I reload the page without having to actually reload the page. It just watches a directory for file changes and refreshes for me. ($10 Mac, beta for Windows).
ZenCoding - This was pretty much the point of the video. It’s a package for Sublime Text 2 that allows you to create HTML really fast and in a unique way using “Koans” and “Haiku’s”.
Obviously I’m on a Mac here, but pretty much all of this is available on Windows.
The soundtrack is “Silver Rings” from The Panic Division off of Eternalism, which is not a word. It’s a fantastic album and I highly recommend you buy it if you enjoyed the track.
And here’s four minutes of what it’s like to watch me code. Four minutes is probably on the top end of what anyone should have to endure.
While trying to install the Azure CLI on OSX, I ran into this error after the installation completed…
zsh: command not found az
This all has to do with your shell, and admittedly, I’m confused by bash profiles. Profiles are simply files that your terminal loads to setup your environment. Normally, these are located in a file called ~/.bash_profile. This happens to be the same file that the Azure CLI tries to write to by default at the very end of the install.
However, if you are using Oh My Zsh, your shell is different and is loading a different profile. The whole point of zsh is to create a “dot file” (these files that begin with . are called Dot Files) that contains a bunch of neat tweaks and setup hacks for directory auto-completion, GitHub help and what not. That means Zsh does NOT load the standard ~/.bash_profile.
In order to get the CLI to work, you need the install to write to ~/.zshrc. So when the last prompt comes up and asks where you profile is, you enter ~/.zshrc instead of taking the default.
If you are confused about whether your shell is launching on the Zsh profile, you can run echo $SHELL.
As an added bonus, if you ever want to see ALL the dot files in your profile directory, you can simply run ls -a ~/
ES6 modules are here, and they’re here to free us from the oft debated JavaScript module debacle that has spawned so many HN discussions. The problem is, as Crockford put it in his talk “Better Parts”, that ES6 modules are “unecessarily complex”.
My own personal journey of module discovery began with AMD and ended with CommonJS, a pattern that I really like thanks to the fact that it was really simple. When I moved to ES6 modules, I felt like I had a really hard time learning them, and I just wanted them to work like CommonJS.
So here’s a quick breakdown for all of my people out there that want to move from CommonJS to ES6, without all the drama.
Importing Modules
Standard Import With Assignment
// CommonJS
var burke = require('./burke');

// ES6
import burke from './burke';
// CommonJS
// -- burke.js --
module.exports.firstName = 'Burke';
module.exports.lastName = 'Holland';
module.exports.sayHello = function(first, last) {
  return 'Hello ' + first + ' ' + last + ' my name is '+ this.firstName + ' ' + this.lastName;
}

// -- main.js --
var burke = require('./burke');

console.log(burke.firstName); // Burke
console.log(burke.lastName);  // Holland

console.log(burke.sayHello('Dear Reader'));
// Hello Dear Reader, my name is Burke Holland


// ES6
// -- burke.js--
export const firstName = 'Burke';
export const lastName = 'Holland';

export function sayHello(first, last) {
  return `Hello ${first} ${last}, my name is ${firstName} ${lastName}`;
}

// -- main.js --
import * as burke from './burke';

console.log(burke.firstName); // Burke
console.log(burke.lastName);  // Holland

console.log(burke.sayHello('Dear', 'Reader'));
// Hello Dear Reader, my name is Burke Holland
In ES6 modules, if more than one value or objects is exported, you basically need to select which functions, properties you want to import. Using the ‘*’ operator says “Get everything the module exports and stick it in this object”. This would be more akin to how CommonJS works.
Also, notice that CommonJS needs the context for firstName and lastName inside of the sayHello function, while ES6 just resolves it for you since you exported all the values. Nice.
But you don’t HAVE to import everything from the module, you can just import what you like by asking for it specifically.
// ES6
// -- main.js --
import { firstName, lastName, sayHello } from './burke';

console.log(firstName); // Burke
console.log(lastName);  // Holland

console.log(sayHello('Dear', 'Reader'));
// Hello Dear Reader, my name is Burke Holland
This allows you to reference these imported properties directly. Is it just me, or does this seem like a bad idea? I can see myself getting super confused about what function is in what object because everything looks like it’s declared in the current file. I can’t think of another language where you can pull in properties like this without a namespace.
Actually, I can think of one good use case, but it’s pretty fringe and if I regurgitate it here, it’s going to look and sound like regurgitation.
There are a few more things that ES6 Modules will do, and they have a TON of benefits that I didn’t even get into here, including being good for the server and the browser, async loading and a bevy of goodness guaranteed to make your skinny jeans cinch up just a little bit.
Go Learn More!
ES6 Modules are grrrreat, but if you’re expecting them to be just like CommonJS, you’ve got an interesting day ahead of you. Hopefully this helped you a little bit in making the jump.
These are called ES6 Modules, and they require a little effort on your part.
That old man in the bookstore in the Neverending Story
Check out these additional resources below. They are comprehensive, and do the issue justice whereas I just wanted your initial experience with ES6 modules to be less like junior high rejection than mine was.
This week, Telerik announced that it was releasing a version of the popular Kendo UI JavaScript library that was completely open source and free; Kendo UI Core. If you aren’t familiar with Kendo UI, it’s a jQuery based JavaScript framework that brings HTML5 to all browsers (back to IE 7) both desktop and mobile.
Kendo UI is a full front-end framework. That means that it has all of the UI widgets that you would be used to using and a whole lot more. Here’s a list so you get a feeling for what exactly is in Kendo UI Core
AutoComplete
Calendar
ComboBox
DatePicker
DateTimePicker
DropDownList
ListView
Menu
NumericTextBox
PanelBar
Slider
Splitter
TabStrip
TimePicker
Tooltip
Window
Sortable
Progress
Button
Color Picker
Toolbar
MultiSelect
MaskedTextBox
Notification
It is also a full MV* framework, which means that it contains everything you need to build a SPA. These are called “framework” components.
DataSource
MVVM
SPA
Effects
Drag & Drop
Validator
One of the very unique things about Kendo UI is that you don’t have to adopt the entire framework to use just a widget. Many frameworks as comprehensive as this one require you to adopt a pattern, but Kendo UI requires only a basic knowledge of jQuery. This means that you could use it for just a DatePicker if that’s all you need.
However, if you wanted to build a SPA with Kendo UI, you can do that too. You don’t need another framework to structure your Kendo UI code. Everything is provided for you.
You may WANT to use your favorite MV* framework and just the Kendo UI Core widgets. Right now, that’s probably AngularJS. Telerik provides the AngularJS integrations for Kendo UI for free as well - also completely open source.
But Wait, There’s More
Also in Kendo UI Core is all of Kendo UI Mobile. Kendo UI Mobile is a framework for building mobile applications (usually hybrid) that respond to the device they are running on so that you can get that native look and feel everywhere.
There are also some great free tools available, including the Kendo UI Dojo for learning Kendo UI and working with shareable Kendo UI Snippets. There is also the Kendo UI Chrome Inspector for the Chrome DevTools as well as npm packages like Kendo Linter which will check your JavaScript and HTML for any Kendo UI errors.
What’s The License?
The license is Apache 2, which means it’s free to use however you wish. Download it, fork it, change it - it’s completely free to use even in a commercial context.
What’s The Catch?
There is no catch. Telerik has built a business on creating gorgeous UI tools. As an employee of Telerik and an original Kendo UI team member, I can tell you that we have wanted to do this for a long long time. The professional grade widgets such as the Grid, Editor, TreeView and Scheduler will remain a part of the Kendo UI Professional package, complete with support. If you find yourself in need of support or these professional grade widgets, you can always purchase the pro edition.
The Apache 2 license opens up Kendo UI to a whole world of developers who might not have considered Kendo UI before due to pricing constraints.
What’s The Future Of Kendo UI
Unfortunately, our industry has rather bad track record of just open sourcing software they have given up on. That’s the old meaning of open source. The new meaning of open source is projects that are active and aggressively maintained and released all in the open. Kendo UI is being open sourced under the new meaning; the same way that jQUery is open source, Angular is open source and Bootstrap is open source.
There are 12 full time engineers continuing to work on Kendo UI Core as an open source project. We will continue to do three major realeases a year with a minor one in between each major. That’s 6 releases a year. The only difference is that now all of the development on Core will be done in the open and YOU can be a part of that release if you choose to be.
Contribute
The quality of Kendo UI Core remains paramount, so make sure you read the contribution guidelines before submitting a pull request. Also, feel free to open issues if you think you have found a bug, but make sure you include a Kendo UI Snippet replicating the issue. Feature requests should go to our feedback portal at kendo.uservoice.com, and questions should be sent as support tickets or forum posts if you are a Kendo UI license holder. If not, please consult the all powerful StackOverflow.
From Our ❤︎ To Yours
This is an incredibly proud day for all of us who work on Kendo UI. The fact that Kendo UI Core is now free to use is the way we have always envisioned it. That day is today. We can’t wait to see what you build with Kendo UI Core.
I think the Bootstrap team said it best when they said, “built with all the love in the world”.
I saw a question on Stack Overflow once where someone was asking for architectural advice on whether or not to use Hot Towel with Kendo UI for a Single Page Application (SPA). My first thought was “What is Hot Towel”?
I took to the Google’s and quickly learned that it’s the creation of John Papa. It’s an ASP.NET MVC project template that gets you up and running with a properly structured SPA, taking care of all of the tedious scaffolding for you. What stood out the most to me about the template, is how well done it was. You get all of the necessary JavaScript libraries, and you get your project properly structured for you so that you are building on top of best practices from square one. Single Page Applications are tedious to setup, and Hot Towel made it trivial to get up and running in about two clicks.
Hot Towel is based on Durandal (amongst several other libraries), and while I don’t use Durandal, I just loved the idea of Hot Towel. I was so inspired by this project that I began work on a Kendo UI ASP.NET MVC SPA Template that would be very similar to Hot Towel, but built entirely on Kendo UI. As of today, the project has officially been released into the Visual Studio Extension Gallery.
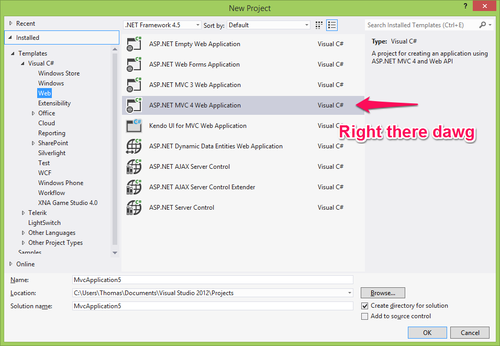
This is an MVC 4 project template, so do File / New Project / C# / Web / ASP.NET MVC 4 Web Application.
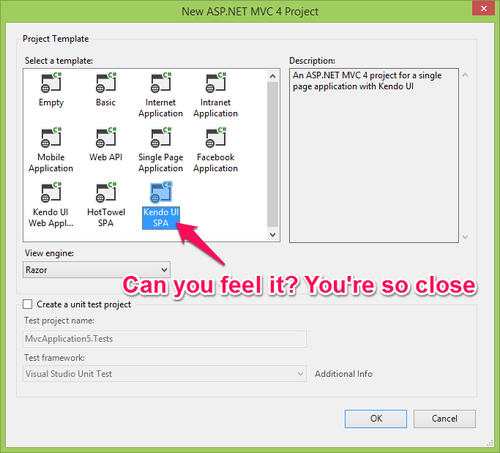
Then Select The Kendo UI SPA MVC Project Template.
And…
BAM!
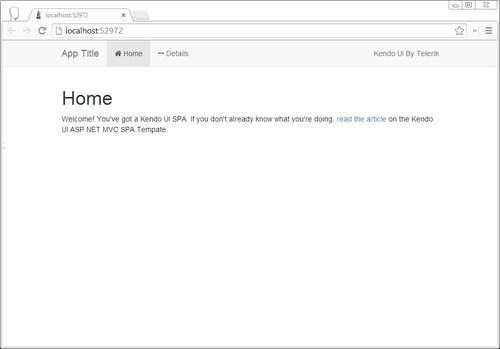
Go ahead and run that there project. You have a Kendo UI SPA baby.
Out of the box, I gave you Kendo UI Web and used it’s lovely Bootstrap 3 integration which is why the whole thing is built on Bootstrap 3 itself, complete with responsive navbar and icons powered by Font Awesome. This is pure hotness right here folks. Only the best for you though. Now that you are an official hipster, I can let you in on the best part of this whole package - RequireJS.
RequireJS Foundation
The application is built on top of RequireJS. If you haven’t used RequireJS before, the next few moments might be a little uncomfortable, but don’t black out. You can always read the RequireJS Fundamentals article after this which goes into more depth. For now, just know that I’ve done all of the dirty work for you which should make your life much easier. I think you’ll get the hang of it very quickly. So here is how it works…
The HomeController opens the Index view in the Home folder. No surprises there. Let’s crack open the index.cshtml file and have a look.
All that noise in the head of the file is from HTML5 Boilerplate. It’s the necessary meta tags to make sure you use the latest rendering mode in IE as well as ensuring that your page doesn’t zoom out on mobile devices.
You can check out the BundleConfig, but just know that it bundles jQuery, a small plugin called “pubsub” that I’ll talk about shortly, a universal console logging shim called “debugger” and all of the Bootstrap.js. The most interesting part of this page is where RequireJS is loaded and it in turn loads the App/main.js file. That’s where the app catches fire, so lets take a look at the main.js file.
The top part of this code defines a path to the RequireJS Text plugin which is going to allow us to load HTML partials dynamically from JavaScript. The second defines a path for Kendo UI. What this does is load in the kendo.js file which in turn loads the necessary modules of Kendo UI.
The second part loads in the app.js file and calls it’s start method which starts a Kendo UI router and ignites the application.
app.js
define([
  'kendo',
  'views/layout/layout',
  'views/home/home',
  'views/details/details'
], function (kendo, layout, home, details) {

  // the application router
  var router = new kendo.Router({
    init: function () {

      // render the layout first
      layout.render("#applicationHost");
    },
    routeMissing: function (e) {
      debug.error('No Route Found', e.url);
    },
    change: function (e) {

      // publish an event whenever the route changes
      $.publish('/router/change', [e]);
    }

  });

  // define new routes here

  router.route('/', function (e) {
    layout.showIn("#content", home);
  });

  router.route('/details', function (e) {
    layout.showIn("#content", details);
  });

  return router;

});
Soak that bad boy in for a second. At the top of each JavaScript file, you will find a define function. These are like your include or import statements. These are the files that this JavaScript file depends on in order to run. These could be JavaScript files, but they can be text files to. You will notice that none of the included files have a js on the end, and that’s because it is always assumed that they are .js files. RequireJS uses these define methods to know what dependencies your JavaScript file has.
You may have noticed the $.publish method in the router change event. This is part of our pubsub architecture and we’ll talk about it more in just a moment. Now we know that the main file loads the app file which in turn creates a router which loads the views.
App/views
All of the views work the same way. The .js file loads in the template, specifies it as the HTML for the view, specifies the ViewModel and then returns back the view object. The layout is just a special type of view which contains common navigation components (a Bootstrap responsive NavBar in this case) as well as handles loading and unloading views.
The html files are loaded into their respective .js files using the RequireJS text plugin. Anytime you see text!, that’s telling RequireJS to load that in as plain text. In this way, we can load in external template files and use them. Pretty neat right?
Take a minute to examine the Home view. The details.js view is nearly identical save for the obvious difference in name.
App/view/home/home.js
// specify kendo ui and the home.html files as dependencies
define([
  'kendo',
  'text!views/home/home.html'
], function (kendo, homeTemplate) {

  // create a view model to bind to the homeTemplate
  var viewModel = kendo.observable({
    title: "Home"
  })

  // create a new view with the loaded template
  // animate the view whenever it shows by fading it in
  var view = new kendo.View(homeTemplate, {
    model: viewModel,
    show: function () {
      kendo.fx(this.element).fade('in').duration(500).play();
    }
  });

  // return the kendo ui view object
  return view;

});
You can see where kendo (which is Kendo UI) and the home.html file are loaded in as dependencies. RequireJS will make sure these files are loaded before it tries to execute the code in the function. The main function declares a view model and then a new Kendo UI View, using the home.html template as the contents of the view. I added a bit of animation on the view show method to fade the contents in.
The layout.js file is a bit more complex.
App/views/layout/layout.js
define([
  'kendo',
  'text!views/layout/layout.html'
], function (kendo, layoutTemplate) {

  var nav;

  var viewModel = kendo.observable({
    // these are the links in the navbar
    links: [{ title: 'Home', href: '#/', icon: 'home', icon: 'fa fa-home' },
            { title: 'Details', href: '#/details', icon: 'fa fa-ellipsis-h' }]
  });

  var layout = new kendo.Layout(layoutTemplate, {
    model: viewModel,
    init: function (e) {
      // store a reference to the nav-links element
      nav = e.sender.element.find('#nav-links');
    }
  });

  // when the router change event is published...
  $.subscribe('/router/change', function (e) {

    // select a nav link based on the current route
    var active = nav.find('a[href="#' + e.url + '"]').parent();

    // if the nav link exists...
    if (active.length > 0) {

      // remove the active class from all links
      nav.find('li').removeClass('active');

      // add the active class to the current link
      active.addClass('active');
    }
  });


  return layout;

});
This is exactly what we saw in the home.js file. We load in a template, create a view model, create a layout based on the template and return the Kendo UI Layout element. There is one big difference here. You can’t help but notice that $.subscribe method hanging out at the end of the file there. What is that?
PubSub
You may have heard the trendy “pubsub” phrase thrown around before. If you aren’t familiar with it, the idea at it’s core is simple; subscribe to a message and do something when that message is published. The reason we do this is that it allows us to very loosely couple our modules. What the subscribe event in the layout.js file is doing is changing the right navbar link to be highlighted depending on what the current route is. That event is being published by the router in the app.js file. Normally we would adjust our API so that we could call some method on the layout.js file from the router. However, this causes API mutation and inconsistency as you try and make all of your views return the same API. It’s easier to use pubsub and keep those methods internal.
Do you recall the $.publish method? Here it is again…
...

// publish an event whenever the route changes
$.publish('/router/change', [e]);

...
This is a message being published. The message that gets published is “/router/change”. We could format the message any way we like, but we format it like a URL to keep things clean and consistent. Whenever the URL of this application changes, the change event on the route is fired and that “/router/change” message is published. Along with it goes the “e” argument from the change event. The “$.subscribe” method in the layout.js file is listening for this message and responds by adjusting CSS classes on the navbar.
You might think “why not just attach an event handler the navbar element?” On first glance, this seems like it would solve the problem the most direct way. However, we need the navlinks to update their active status even if they AREN’T clicked. Consider someone coming directly to the “Details” page. We want the “Details” link to be highlighted even though the details link was never actually clicked. By tying into the Router change event, we can update the navbar to match the current page in the application, regardless of whether or not the navbar is ever clicked.
The last thing we need to examine in terms of app structure, is the kendo.js file.
App/vendor
Kendo UI is a MASSIVE framework. It’s modular though, and it’s also aware of RequireJS and each module knows it’s own dependencies. Out of the box, the Kendo UI MVC SPA Template only uses the Kendo UI View, Router and Fx (for view transition animations). Let’s have a look at the kendo.js file in the “vendor” folder.
// add new Kendo UI modules here to have them included
define([
  '../Scripts/kendo/2013.3.1119/kendo.router.min',
  '../Scripts/kendo/2013.3.1119/kendo.view.min',
  '../Scripts/kendo/2013.3.1119/kendo.fx.min'
], function () {
  return kendo;
});
The required Kendo UI modules are being included at the top. If I was to add a Kendo UI DropDownList to this application, I would add a kendo.dropdownlist.min include to the top of this file. Any other modules that the DropDownList depends on, like kendo.popup.min will be automatically loaded thanks to Kendo UI’s integration with RequireJS.
Adding A Build
Unfortunately, I can’t confirm whether or not you have Node installed on your system. If you do, you can run the RequireJS build tool. I’ve already included an app.build.js file which can be run with the optimizer to concatenate and minify all of your App JavaScript files into one main-built.js file. You can add the following to your post-build events and it will call this file for you.
if $(ConfigurationName) == Release node $(ProjectDir)/Scripts/r.js -o $(ProjectDir)/app-build.js
Now when you switch to release mode, Visual Studio will call the RequireJS optimizer from Node and “compile” your App JavaScript. You just need to go into your Home/Index.cshtml file and switch the data-main from main.js to main-built.js. You can automate that part as well by using #DEBUG and #RELEASE compile flags.
And Lastly, Font Awesome
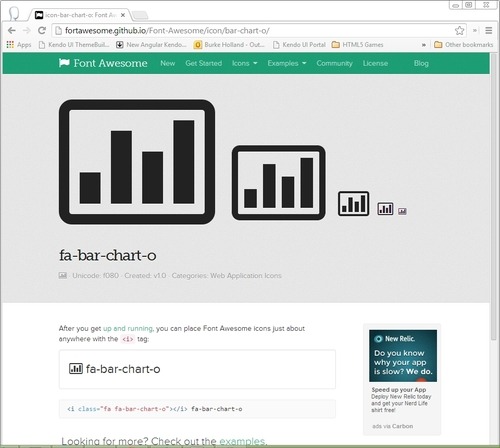
I’m ALWAYS in search of icons when I build my apps. I feel like I’ve spent more of my life perusing icon packs than I have actually building applications. Font Awesome changes all that by delivering 369 completely free icons as an icon font. Since we are using Bootstrap, it integrates right in. You can use an icon anywhere you wish. For instance, if you wanted an icon for say a chart, you would first go to the Font Awesome “icons” page and search for “chart”. Click on the icon you want to use. You will be taken to another screen where you will get a large preview of the icon AND the html that you need to use to make that icon appear. In the case of the chart, it looks like this…
I Would Like To Thank…
My mother for always believing in me and John Papa for creating the really awesome “Hot Towel” SPA template. I could not have created the Kendo UI SPA package without being able to closely examine what John did and copy much of his setup code for the VSIX. Creating VSIX installers is not for the faint of heart and there is no way I would have gotten through it without someone else’s code to examine and learn from.
That’s the Kendo UI SPA MVC Template. Got suggestions? Ideas for making it better? I would LOVE to see your pull requests and changes. This is a v1 release and by no means feature complete. I think that proper project templates are absolutely essential to developers and I want to make sure that this template is “proper” in every since of the word.
About a year after I promised Addy I would get this done, the first version of the Kendo UI Yeoman generator has arrived. The goal of this generator for me was to get an understanding of how Yeoman generators are built and to create a very basic generator that could be extended for all manor of project scenarios.
So let’s get it running…
> npm install -g generator-kendo-ui
You might have to sudo that if you get a permissions error.
Now create a new Kendo UI Project with Yeoman
> mkdir new-project && cd new-project
> yo kendo-ui
You will be greated with the out-of-the-box components list. All are selected by default. Right now you get Bootstrap, Modernizr and RequireJS. If you select Bootstrap, the generator will use the Kendo UI Bootstrap CSS integrations as well as include the bootstrap.js file in the index page. If you de-select Bootstrap, it will use the Kendo UI default styles and that is all.
Modernizr gets added to your page automatically unless you de-select it.
RequireJS just gets copied to your project’s scripts directory. It’s really just saving you from having to type bower install requirejs. You’re welcome.
You can run the project (with LiveReload capabilities) by running…
> grunt serve
Upcoming Tasks
Here are a few of the items that I would like to see incorporated into this generator for a good v1:
Add concat/minify grunt tasks
If RequireJS is chosen, wire up a simple main file
Add CoffeeScript support
Add test framework support
yo kendo-ui:spa
should generate a boilerplate SPA application
Add express as a choice when creating the application
Add FontAwesome if Bootstrap is chosen
If you have any other suggestions or ideas, PLEASE feel free to fork and send a pull request.
You already know that Kendo UI has magnificent widgets. UI is in the name, and Telerik has a long proud history of building amazing UI components. What you may not know, is that you can actually use Kendo UI (specifically MVVM) to work with plain HTML to construct your own widgets. This is sort of like running on the bare metal, but it’s tons of fun and thanks to Kendo UI’s streamlined MVVM, it’s quite easy as well.
Looping: How Rumors Get Started
Knockout provides the ability to loop over a collection by implementing a for iterator. The power of this really can’t be underestimated since it allows you to take collections and render them visually with HTML getting fine grained control over how each of the items will look. The only problem with this, is that for loops can get unwieldy and don’t mix very gracefully in HTML attributes. This earned some bad rep for Knockout in it’s early days through no fault of the framework itself. Regardless of it’s tendency to clutter HTML, it’s a powerful construct that is noticeably absent from Kendo UI’s MVVM implementation. Or is it?
Kendo UI will actually gladly loop over any collection and construct the contents based on HTML. You don’t need a widget to do this. Honestly! Kendo UI will take any element bound to a valid collection, and as long as a template has been specified, it will iterate over the collection appending a new item composed from the template for each item in the collection. That’s a lot of words, so let me show you a simple example.
There is a ul with a data-source set to an array on a Kendo UI Observable. The source array things contains only strings. We can repeat each one of these items and specify how it should look by using a template. Since there are no objects in the array and only strings, specifying data is sufficient to display the value.
If you’ve been working with Knockout or Angular, your very next thought is probably “If I update the the array, does the HTML update too?” Let’s find out.
The array on the Kendo UI Observable gets wrapped as an ObservableArray automatically. This means that we can work with it’s items and Kendo UI keeps the HTML in the loop. So far this is interesting, but not really impressive. Let’s build a more complex example and work with the existing items themselves adding some more in-depth markup. Let’s tweak this example so that we can edit each individual item to find out how detailed our bindings currently are.
As it turns out, each event that gets dispatched from a Kendo UI MVVM binding includes the associated data item if there is one. Lets turn to the over-used Todo list example to see this in action. Then we’ll walk through the code. The following example contains no widgets and is almost entirely powered by the keyboard. Enter a new item and press enter to save it. Double-click an item to edit it, and click enter to save your edit.
First look at the HTML that goes into constructing this example.
If you look through the HTML (there isn’t much of it), you will see a few interesting bindings; notably the keypress and dblclick bindings. You may not have used these bindings before, but they are incredibly powerful. In this example, they allow us to interact with the application without adding any buttons.
Another interesting feature is a subtle one in the template. Each item in the template is going to be paired with an item from the collection in JavaScript. The span holds the viewable value while the input holds the editable one. Both are bound to the same value. But notice that the events like dblclick and blur are bound to events as well. If the title property exists on each data item, do the functions edit, save and enter need to exist there too? Lets look at the JavaScript and find out…
(function() {

  // constant for enter key code
  var ENTER = 13;

  // datasource starts empty and defines schema
  var things = new kendo.data.DataSource({
    schema: {
      model: {
        fields: [
          { title: "title" }
        ]
      }
    }
  });

  var o = kendo.observable({

    things: things,

    add: function (e) {

      var item = $(e.target);
      var value = item.val().trim();

      // if the enter key was the key pressed, and
      // the value entered is not whitespace or blank
      if (e.which === ENTER && value.length) {

        // add the value to the datasource
        things.add({ title: value });

        // rest the input value
        item.val('');
      }
    },

    edit: function (e) {

      e.data.set('editing', true);

      // set the focus so the user doesn't have to do
      // it manually
      $(e.target).next().focus();
    },

    enter: function(e) {

      // if the key pressed was the enter key
      if (e.which === ENTER) {

        // call the save function
        this.get('save')(e);

      }
    },

    save: function(e) {

      // if the item has a value
      if (e.data.get('title').trim().length) {

        // toggle out of edit mode
        e.data.set('editing', false);

      }
      else {

        // its blank or whitespace so just remove it
        this.get('things').remove(e.data);

      }
    }

  });

  kendo.bind(document.body, o);

}());
The events actually exist on the main view model, not each data item. However, Kendo UI is smart enough to map these bindings up the tree to find the matching handler. This is really nice because while we want access to each individual item from the collection in the template, we also want access to the root view model which is what Kendo UI provides us. Further, each bubbled up event actually contains the data item from the element on which it originated via e.data.
Also notice that there are virtually no jQuery selectors in this code. We are almost entirely concerned with updating the state of the model, which in turn controls the state of the HTML. This makes the code extremely portable. You could literally pick this up (HTML and JavaScript) and drop it on another page and it would “just work”.
Inheriting To Encapsulate
What if we wanted two of these lists on a page? If you duplicated the above HTML (not including the template) and bound the whole document to the same view model, you would get two lists. However, they would always display identical data. Whatever action you took in one would apply to the other. You probably wouldn’t want this. To make a reusable component, we can encapsulate all of our login in a class. Since JavaScript doesn’t have classes, you would normally have to do some wizardry to pull this off. Kendo UI does this black magic for you via the kendo.Class.extend method so you can just work with classes as if they actually exist in JavaScript.
Now a new todo list can be created by including the markup required to generate the component and creating a new Todo, which will create new instances of the datasource and the necessary view models. The template can be shared between both without issue.
Immediate Updates
One last issue that I wanted to touch on was a slight misunderstanding that I see from time to time regarding Angular. Angular is a fantastic framework. We think it’s well done and that’s why we are working hard on Kendo UI directives for Angular. I do sometimes hear folks say, “yes, but Angular updates AS YOU TYPE WHICH IS AMAZING!”. It is pretty neat isn’t it? Turns out, Kendo UI does this too.
Kendo UI will by default wait until a field blurs before it syncs changes. This is because it’s more efficient to wait until an edit is finished than to check every time you hit a key. Less checks are faster than more. That’s just common sense. You can override this behavior by using the data-value-update attribute on the element that you want to update the binding on when a key is pressed.
People often ask me, “Which framework should I use with Kendo UI?”. If you’ve made it this far into the article, you can probably guess what my answer is; Kendo UI. You should be able to use your favorite JavaScript framework and Kendo UI widgets will work right along with it. That might be via the Knockout Kendo UI or Angular Kendo UI projects. However, if you haven’t yet chosen a framework, and you think you need to to structure your code, I urge you to think again. Kendo UI provides a full stack for developing rich desktop and mobile SPA’s and applications with JavaScript. Not only do you get the best UI widgets available, but they come with a powerful framework that has all of the features that you might find in other MV* frameworks.
Full Todo List Example
I’ve also just updated the Kendo UI TodoMVC example to include the new Router component in the Kendo UI framework. Make sure you check that project out for a really in-depth look at what you can make the framework do without any widgets at all.
I’ve read a lot of reviews in the past two weeks now that LEAP has finally released the “look ma no hands” device that is going to turn is all into Tom Cruise and have our eyeballs replaced.
I’ve read a lot of complaints. It’s slow. It crashes. The apps don’t work. Nobody has yet been saved from a murder that hasn’t happened. Things like that. I like to be the judge of things myself and since I was a LEAP preorder - I think I preordered it sometime during my early adolescence - mine shipped nearly two weeks ago. Here is my experience so far.
When LEAP informed me that my pre-order was ready to go and asked me to confirm my address so that they were sure it was going to the right place, I promptly did. Then I immediately moved. My LEAP shipped on July the 17th via FedEx to the Post Office (WAT). It was out for delivery on by July the 24th. However, on the night of July the 23rd, I submitted a change of address form online. It cost me a dollar, but I believe that you get what you pay for. Since the US Postal System is a well oiled machine, they immediately sent my LEAP into a black hole they can only explain to me as “The Forwarding System”. As best as I can tell, here is how it works:
All mail is scanned by some machine which can miraculously read handwriting and labels placed in any location on the envelope or package. Apparently every post office has one of these. I can only assume this device was the last and most powerful invention of the late Nicola Tesla. This amazing display of modern technology then routes your mail to the appropriate place.
Once this wonderful contraption sees your letter or package going to an old address, a giant vortex opens up under the machine and your parcels are dropped into it.
Here is where things get a bit fuzzy for me. The machine is able to sort your mail, but if it forwards your mail, it has to go into the vortex where there is assumably another machine which repeats this same process. In the case of TN, this vortex of blackness and mystery is known as “Jackson”. Now that they have carted your mail 4 hours away, there is no way they can track it. This is the Post Office. They do not possess that sort of technology. Don’t be ridiculous.
Now when your mail has entered the vortex/forwarding center, you can do nothing but wait for it to be randomly spat or shat out the rear end. However long that takes is unknown, but it can take anywhere from 2 hours to 14 days. At this point, your mail comes back onto the grid. It’s been two weeks and you have made many phone calls and inquiries about the status of the vortex, but of course, nobody knows. This is not a system that you can understand and track with a simple code. You fool.
After some random amount of time, approximately 2 weeks, your mail begins to show up in the tracking system again. However, you cannot get it. You cannot get it because you now owe money to the vortex. Your package is not at the post office, it is with your friendly mail carrier. He visits your house (where you are not present as you do in fact have a job), and leaves a note telling you that you owe him/her money. You need to pay the carrier so that they can in turn pay the vortex, thusly appeasing it’s wrath and keeping the “old ones” asleep until the next vernal equinox.
The trick seems to be to catch the post office between the time the mail carrier leaves in the morning (around 7:47 AM) and the time they get back to the post office (around 4:47 PM) but before the post office closes at 5:00 PM. This seems like it would be rather easy to do, except for the fact that every other person with a package held hostage by the post office is also trying to pull off the exact same feat. Leaving you fighting with each other like a rabid and wounded animal. The Post Office is also under the impression that 1 staff member should suffice to handle the 31 seething people in line who are all on the verge of a schizophrenic break with reality.
If you do not catch the package in the roughly 13 minutes during the busiest part of the day, the process will repeat itself over and over again each day for an undisclosed amount of time. At which point the Post Office will return the box to sender sending it back into the vortex - and well - you already know what happens after that.
Hopefully this review has really opened your eyes and helped you decide whether or not you should buy one of your own, move, and then descend into a lower circle of hell. I wanted to do an unboxing video for you, but until I fork over $3.77, we’ll just have to wait longer.
The web platform will eventually be native everywhere because the web always wins.
As a follow-up to the previous blog post I did a webinar with Paul Kinlan of Google on building Chrome Packaged Applications. He covered all the awesome stuff you can do, and I did the bit about building the apps using Kendo UI. I specifically go over the CSP and how to use the Pkg.js plugin to work inside of a sandbox.
Check out the video I cut before the webinar here. Also for your viewing pleasure, I did the whole thing with a Minecraft head on.