SHOOTING STARS BARWOOD STYLE
For those who have tried and failed, and for those who just think it’s way beyond your skill limit (it’s not!), John Barwood explains how to make your star pictures look like more than just a sneeze on a black square.
If you have ever found yourself under a blanket of stars and tried to capture it on your camera, one of three things will have happened. One, you got an amazing star shot, well done, post it to Facebook and pull yourself a well deserved drink! Two, your image was totally black, or three, there were stars but they were all blurry. Well the good news is it’s not that hard to get a beautiful shot of all the stars and galaxies up above us, you just need to know a little bit about your camera, the environment and hope for a clear night.
SETTING THE CAMERA
You don’t need a fancy DLSR (although it does help), any camera that you can use in manual mode will work, but you will need a tripod or something to keep it very steady. If you don’t want to invest in an expensive tripod the Joby Gorillapod is brilliant. Once you have your camera attached to your tripod and set to manual, open up your aperture to its largest setting (the smallest f number). Next, set the ISO as high as you can on your camera without the picture becoming too noisy, ISO1600 is a good place to start but many cameras will look good at ISO6400 and beyond.
Now you can experiment with your shutter speed to achieve the shot. I always start at 30 seconds and adjust from there. If your camera has a bulb setting and you buy an external shutter release (about £5 on ebay) you can keep the shutter open as long as you want.
Here is a self portrait I took using exactly this system. The camera settings were f/2.8 20 seconds at ISO3200:

Focusing at night can also be a nightmare. If you can find a small light source off in the distance, focus on that and then switch the camera to manual focus and forget about it. Alternatively, manually focus all the way to infinity and then just turn the focus ring back a hair.
SETTING THE SHOT
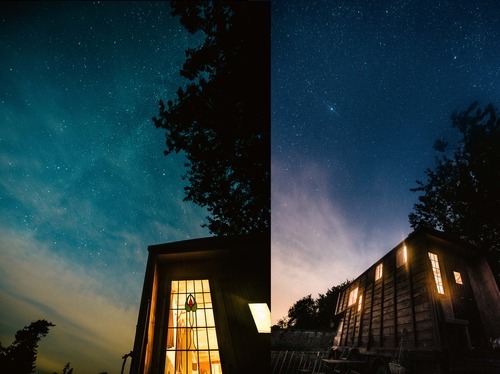
If you point your camera at the sky you will get a nice shot of the stars but it will look very random. It is best to try to visualise your shot, and even better, actually set it up during daylight hours. Try to frame it with a foreground element, i.e the tops of some trees or even the place you are staying, like these ones at Canopy & Star’s Lovestruck in Somerset:
Any shots between 1 and 45 seconds will produce a still image of the stars, however if you have a cable release and go beyond 45 seconds, as the Earth rotates the camera catches this and you get star trails! It’s very hit and miss with some lasting many hours, but the effects can be magical.
GETTING EXTRA CREATIVE
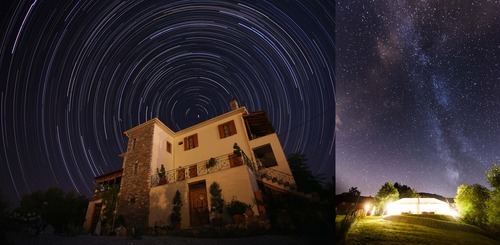
Why not paint over the foreground with light from your torch? You can do anything from subtly highlighting your subject to adding a crazy light streak effect. Alternatively, if you want to learn how to composite many shots together in Photoshop to create star trails (like the first picture in this post), visit John’s blog for an in depth explanation.
John Barwood is a brilliant Bristol based Wedding Photographer who very occasionally moonlights as one of our professional photographers. To see more of his portfolio or ask him any questions, visit John Barwood Photography.