A Simple Neon Sign Tutorial [TS4]
- Sims4Studio
- Blender 2.9
- Any image editor
1. Open S4S. Under “Object”, select “Create 3D Mesh” then click “Object”
2. Search for “plank” and select the wall light.
3. Under the meshes tab, click export mesh (make sure LOD 0 is selected in the dropdown).
4. Open the exported file in blender.
5. Select “s4studio_mesh_1″ from the top right menu. Then press TAB to go into edit mode, and then press A to select it all.
6. Press X and select “Vertices” in the menu that appears to delete the object. Do not delete the object from the top right menu.
7. Now press TAB again to go into object mode, and add a text object using the bottom left menu.
8. This will add a generic text object to the mesh. Press TAB again to edit it and enter whatever text you’d like.
9. Now press TAB again and select the font menu from the top right menu.
10. Find these options and press the folder icon next to “Regular”.
11. Navigate to your font folder and select the font you’d like to use. (Windows users: open “Font Settings” from your settings and you can preview all your fonts).
12. Now your text should be in your selected font.
13. Press ALT C and select “Mesh from Curve”
14. Press TAB then CTRL + N, and tick the “Inside” box that should appear in the bottom left.
15. Press TAB again and select the modifiers menu from the bottom right. Then click “Add Modifier” and find “Decimate”. Make sure you’re in object mode, not edit mode.
16. Select the “Planar” option and increase the angle limit as much as you can before the text becomes too distorted. 15o is generally your best bet.
17. I’m now adding a border around my text. If you don’t want to do this skip to step 20. In edit mode, add a “Plane” to your mesh. Drag the edges in till it fits around your text and raise it so it lays flat with the text.
18. Press I and drag your mouse towards the centre of the mesh until you get the desired border width.
19. With face select on, select the centre face, press X and select “Faces”.
20. With all the mesh selected, press R and click wherever. In the bottom left menu, enter 90o as the angle and tick the Y and Z boxes under “Constraint Axis”. Drag it around until it’s fairly centred and lines up with the shadow box.
21. In edit mode, press E and drag forward until the desired depth.
22. In the top right menu, click on “Text” and shift-click on “s4studio_mesh_1″, then press CTRL + J.
23. In edit mode, make sure all your sign is selected, then click “Image” > “New Image” in the far left corner. Click OK. You should get a weird set of lines and the texture on your mesh should look terrible. This is normal.
*This is UV-mapping. Normally faces are selected one-by-one to create a nice clean texture map which can then be used to create beautiful textures. However since our sign will be flat white with no shading, it doesn’t really matter.
24. Press SHIFT + CTRL + S to save your file.
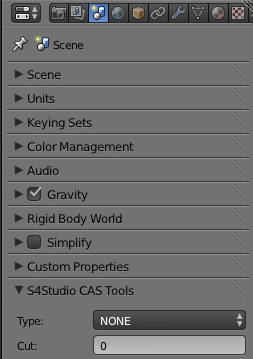
25. In the top left, delete “s4studio_mesh_0″. Then select “s4studio_mesh_1″, open the “Scene” menu and change “Cut” under “S4Studio CAS Tools” to 0. Repeat step 24 but do not override your other mesh.
26. Open S4S again. Under the meshes tab, for each of the non-shadow LODs, import your first mesh. For the shadow LODs, import your second. You may need to make different LODs depending on your mesh’s complexity.
27. In an image editor, make a 64x64 white png.
28. In the “Textures” tab in S4S, import your white square as the texture.
29. And we’re done! Save in S4S, put the package into your mods folder and enjoy your new light :)