msginnyliz reblogged

I wrote a tutorial so you can cheat at embroidery by using your sewing machine. Enjoy!
It’s always so weird to me when a post of mine comes across my dashboard. Does this mean I’m cosfamous now? 😂😂

I wrote a tutorial so you can cheat at embroidery by using your sewing machine. Enjoy!
It’s always so weird to me when a post of mine comes across my dashboard. Does this mean I’m cosfamous now? 😂😂
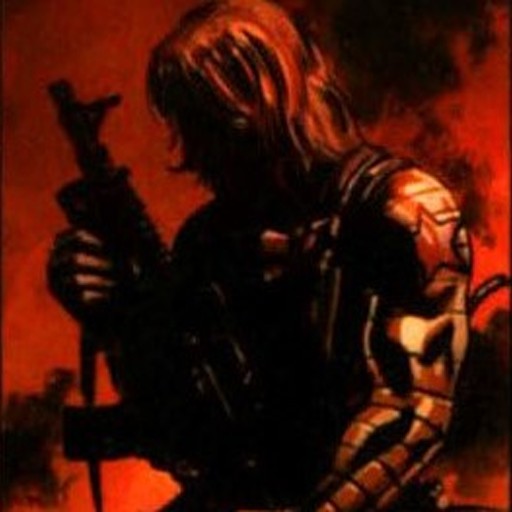
We’re strong enough to take what we want by force. More info about my Cinder cosplay —> http://ginnyliz.com/cinder-fall.html
I'm so fancy 💕 Art Nouveau Squirtle cosplay made by me, designed by Hannah Alexander Artwork!
I thought you were the girl that wanted power. Photo by Ken AD Photography 📸 More info on my Cinder costume on my website! http://ginnyliz.com/cinder-fall.html
Me when my cosplays start finally coming together
I wrote a tutorial so you can cheat at embroidery by using your sewing machine. Enjoy!
#Regram from @t_poolio featuring @gingeriiz PC: @worldofhsl ・・・ Thr wonderful @gingeriiz and myself as Captain Kenway! 📷 @worldofhsl #assassinscreed #edwardkenway #blackflag #jackdaw #ubisoft #cosplayersofinstagram #cosplay
Oh look it me
"When you're placed on a pedestal... you become separated from the people who put you there in the first place." Finished editing the first photo of Pyrrha! Enjoy, friends ❤️ Cosplay/Model/Photo by me Wig is a Jeannie from Arda in Crimson!
Currently working on formal!Pyrrha! The wig is done, and I finished the crown last night.
IS SO FANCE
The crown is made from styrene-backed 4mm EVA foam with hot glue details cast from silicone molds, primed with Plasti-Dip, and painted with a blend of Jacquard and Craftsmart paints.
The wig is a Jeannie in Crimson from Arda Wigs that I styled and cut myself!
I’m a cosplayer, I’ve worn contacts for almost 18 years, and I’ve seen so much horrifyingly dangerous behavior with colored contacts and general eye safety in the pursuit of our hobby that it makes me want to scream. I’ve ranted about this before on Twitter (and often) so I decided to make a megapost about it.
I AM NOT EXAGGERATING ABOUT FUCKING UP YOUR EYES FOREVER. I have seen people LOSE AN EYE or get permanent eye damage from unsafe behavior; I’ve also seen people carted off to the hospital over it. Colored contacts and heavy eye makeup can be entirely safe, but you have to know how to use and wear them properly!
This post will be very long, but I encourage everyone who has an interest in colored lenses (especially circle lenses!) or cosplay makeup to read it. I don’t want you to lose an eye.
I finished my Suvi Anwar (from Mass Effect: Andromeda) just in time for C2E2 -- AND the science march in Chicago! Suvi is important; not only is she the game's lead scientist, she's also LGBT+ and a woman of faith. And if we're to normalize diversity in STEM, we need representation not only in the real world, but also in the stories we tell. ❤️
Squirtle 🌊
Cosplayer: me! @gingerlizcosplay Original design by Hannah Alexander Artwork Photographer: Sara Lynn Photography
How to make custom lace appliques – the “Frankenlace” method
A lot of people asked for more info on how I made the appliques that decorate the bottom of Zelda’s gown. Here’s my tutorial for the whole process! This method can be used to make all kinds of applique shapes and designs if you get creative with it.
This method is very time consuming and requires a lot of patience and concentration – but I just love the results! I wanted to achieve the look of professionally-made applique, but without access to industrial equipment, this was the next best thing I could come up with.
The white-on-white effect is subtle, but matches the look I was going for. Photo by Vontography.
I hope this is helpful to some of you in your own costume projects. Let me know if you have any questions, and good luck!
This Women’s day, take the opportunity to learn about Myrtle R Douglas, the woman who designed, made and wore the first documented fan costume alongside Forrest J Ackerman in 1939!
Since the Merrill bracers themselves were probably going to be out of most people’s price range, I’ve gone ahead and posted the pattern for free, because I luv u nerds.
Didn’t have time to make proper, printable scans, but it’s laid out on a 1" grid so it should be easy to figure out. The straps are riveted to the back piece and then criss-crossed such that the rivets don’t show, tacked down temporarily with contact cement and then stitched around the edges to keep everything strong & tidy.
I used 4-5 oz veg-tan leather for this, but craft foam would probably make a decent (if more delicate) substitute. The straps for the wrists I riveted on at the A3/B3 holes, and the straps for the forearms are riveted at A9/B9, then both are included in the edge stitching. The length of those straps should be arm/wrist circumference + 4".
That pattern gives you way more length than you need for the palm strap, so figure out how much overlap you want, cut off the excess, and stitch it down.
Uhh, I think that’s everything. More angles of the finished bracers here.
And as always, if you do happen to be rolling in money, Armory Rasa can make them for you. ^_^
OKAY BUT THIS WAS PERFECT. Katara: me Sokka: Korncake Cosplay & Photography Hoodies by Rarity's Boutique
pro tip: if you need to transfer a complicated design onto foam, sketch it or trace it onto paper, go over it a few times in pencil, and then flip it over on the foam and rub with something hard
and then you can do something like cover it in puff paint and put flowers on a warhammer